Pages

Showing posts with label straw set. Show all posts

November 15, 2013

Halloween 2013

Hi all!
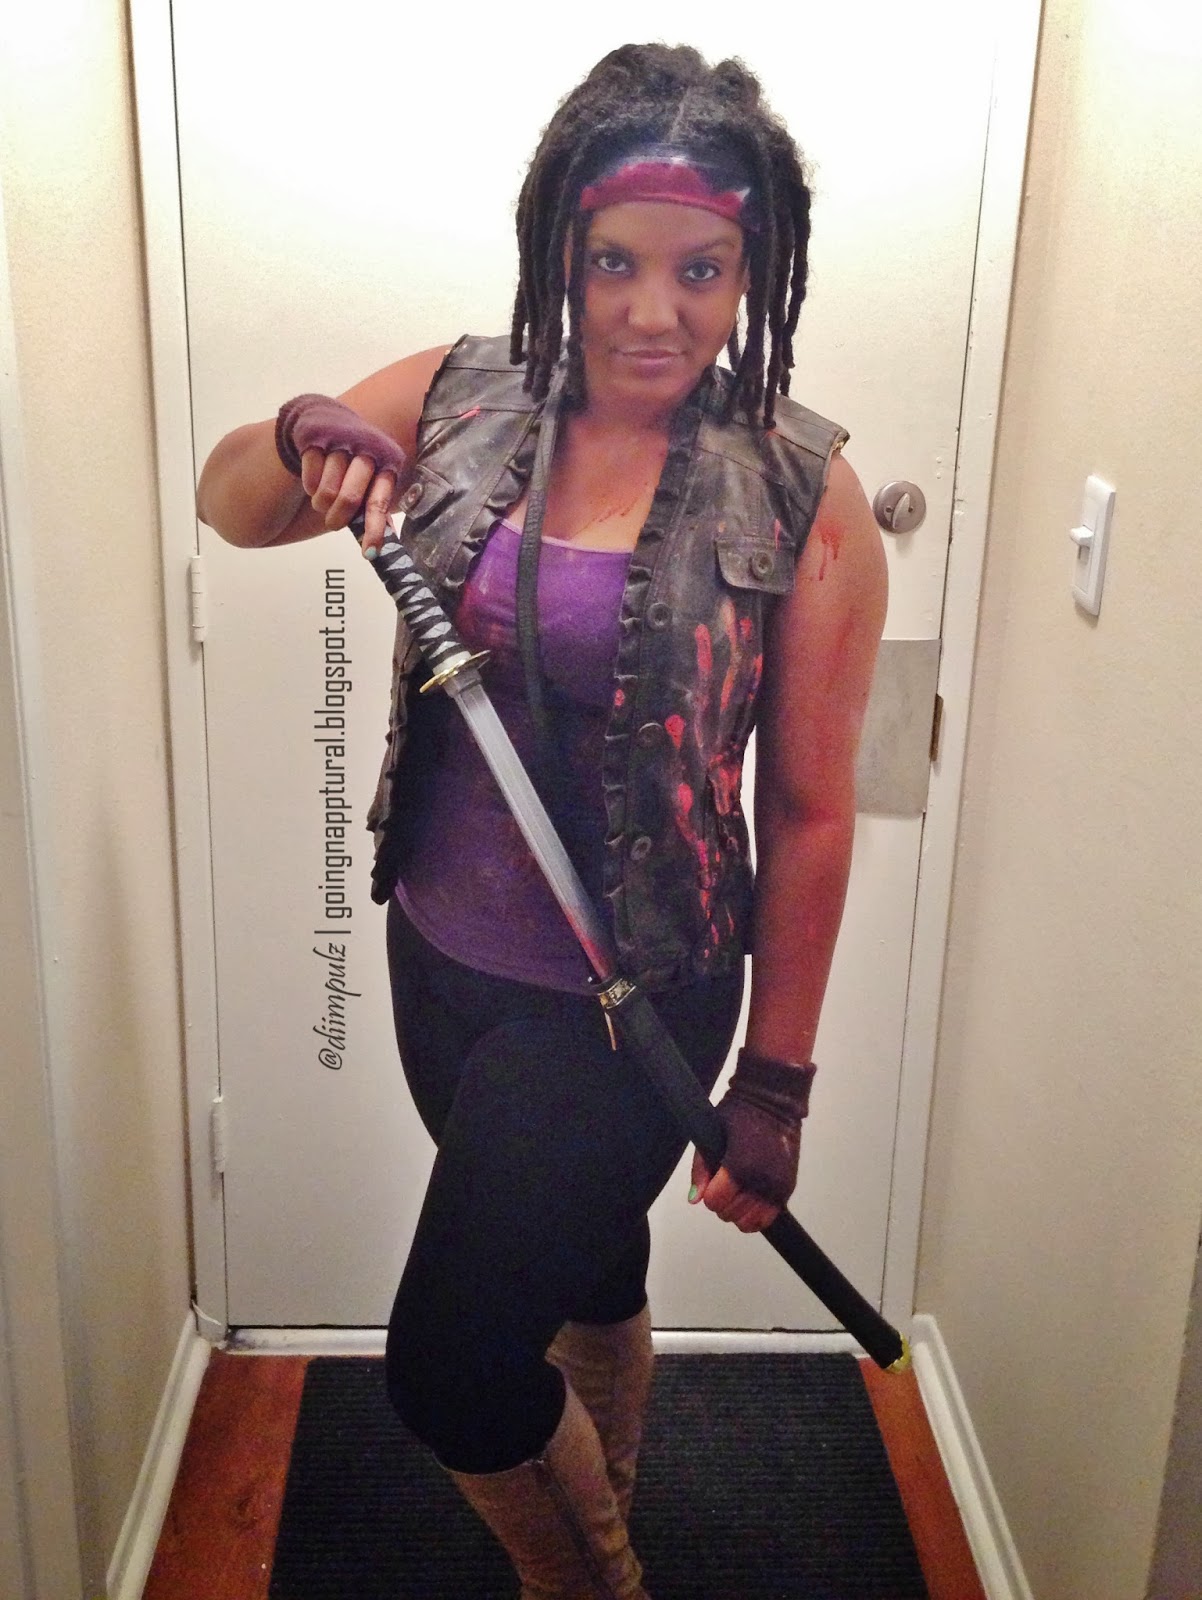
I know it's a whole new month now, but still, here is an update on how I wore my hair for Halloween. This year, my boyfriend and I decided to return to a themed couples costume. Our mutual love of The Walking Dead tv show prompted us to go as two of its characters: Rick Grimes and Michonne. Two very awesome, very badass individuals. 
Rick & Michonne
Disclaimer: I do not own this image. 
As you can see, Michonne wears locs, which I obviously don't have, but are very essential to portraying her character in costume. I had previously purchased a wig of locs when I was Lil' Jon for Halloween in high school one year, but I had left it at my mom's house and there was no way I'd be able to get it in time for this year's events. So what's a girl to do?

I created faux locs! How, you ask?
I gave myself a straw set! Then I simply removed the straws and left the curls chunked instead of separating them like I normally would. This was the result once I slapped a headscarf on it:
Pow! Faux locs!

Side-by-side with the TV character:
Disclaimer: I do not own the image on the left. 

And here is my full ensemble:

Can't forget my boyfriend:
Disclaimer: I do not own the image on the left. 

Lastly, two couple shots:


We took our costumes to Zombie Walk Long Beach which is a really fun annual Halloween music & art festival where everyone attends dressed in their Halloween costumes - particularly as zombies! Our costumes definitely were recognized among all those zombie enthusiasts. We had multiple people and groups of people stop us to ask for pictures! Overall fun! Thanks hair, for adding the finishing touch! =)


January 13, 2013

Update: Christmas Straw Set, NYE Wash & Go

Hi all!

This is an update on the styles I wore for the holidays.
Christmas Eve and Day were a usual straw set. I spent the holiday on the East Coast where I wore the same straw set for 6 days. Even through that...my hair held up fine in the wind, rain and snow. 

Christmas Eve, 5th day hair:

Christmas Day, 6th day hair:


For New Year's Eve, because I was much too lazy to do a straw set on December 30th, I woke up on December 31st not exactly sure what to do with my hair. I wanted something cute, and I did NOT want to wear my hair in a puff like I usually do when I don't wear my hair down and out. So I opted to wash my hair and try some finger coils.

It took me about 2 hours in the bathroom with leave in conditioner and gel to define my curls with my fingers and work with my stubborn multiple-textures. Then I didn't like the result and threw it into a high puff anyway. I was extremely frustrated that I had spent all that time on a look I didn't even end up liking and that I resorted to an everyday look (a puff) that I did not want to wear on a holiday.

So about 10 minutes after I put my hair in a puff, I went back to the bathroom, sprayed my hair with water and just combed it out. My hair already had leave-in conditioner and gel in it, so I ended up with a mostly-defined wash and go that only took 10 minutes. Yeeesh, after all that! Ever have hair days like this? Lol.

I added a black sequined headband and gold earrings to complete this NYE look:


I hope your new year is off to a great start! 
Until next time! =]

August 24, 2012

Finger Coils & Braidouts & Straw Sets, Oh My! (Pic Heavy)

Hi all! 
Since I cut the rest of my relaxer off and finally became 100% natural, I've been experimenting with different methods and looks. This post is a quick breakdown of the ones I've tested so far.


Finger Coils
This was my first attempt at finger coils on my whole head. The method I used was to literally separate my hair and coil individual pieces of it. The only products used are the Cantu Shea Butter Leave-in Treatment and water. I think next time I'll try using gel too. Here's how it turned out:


(Excuse the Cantu Leave-in at the top right! Gotta blend that in better next time!)
VERDICT: I really like the curl definition! My main gripe about this style is that when it dries, there is mucho shrinkage. Shrinkage isn't really my enemy, but if I'm going for a stretched look, this isn't the way until my hair gets a little longer. 

Braidout
This was my first braidout ever in which I didn't have to use something to secure the ends of my braids!!! Remember when I used to have the problem of imminent unraveling!? Now I just braid my hair up and finger coil the ends and they stay put! Wooh! Just like this:


And this was the result:

Compared to how it would turn out at the very beginning of my transitioning journey:

Maaaaaajor volume difference!!
VERDICT: I like the braidout, but it's not quite my favorite look. I really haven't mastered it yet and need more practice before I'll feel comfortable wearing it out like this. Plus, there are still a few straight ends scattered about and I feel like they're very visible because, just like when I was all relaxed, the ends don't curl.


Straw Set
Of course. The go-to. It doesn't look much different from what it looked like before I cut the ends off: 


BUT, it looks VERY different from the straw sets at the beginning of my journey as well:

Yet ANOTHER dramatic change.  Uh..i think you know the verdict for this one! I love it so much more now! It looks so......."lifeless," is the word that comes to mind, in that last pic! Since I've been straw setting throughout my whole transition and this major volume change was gradual, it's still a shock to see it side-by-side every time! Lol.

Click Here For My Straw Set Tutorial

Speaking of straw-sets, I am definitely going to be doing a giveaway of a "Straw Set Kit" for one lucky blog reader. If you're transitioning, this is perfect for you. I plan to give away all of the products I used (and am still using) to create a straw set during my own long-term transition.  I need to make a video to let my YouTube subscribers in on the details and once that happens, I'll post them here as well. But, I wanted to give my loyal American readers a heads-up before then! (I am soooooo sorry to exclude international readers, but I don't have the resources to ship overseas at the moment. It's a possibility for future giveaways though!) So, be on the look out for that! 

Aaaand..speaking of YouTube, this post has inspired me to do a video montage of side-by-side comparisons of hairstyles just like this. I think that's what's next on my YT video to-do list!

Well, that's all for now!
Thank you for reading and have GREAT weekend! 

P.S. You can follow me on Instagram for more hair photos! My username is "diimpulz."
If you choose to follow, let me know that you found me through my blog! =)

July 17, 2012

Growth Update: 22 Months Post-Relaxer

Hi all!

I haven't updated in a while mostly because there hasn't been a whole lot of *new* going on with my hair. 
I'm doing my usual straw sets and caring for my hair the same way I have been the past year or so and I really haven't experimented with any others styles or methods lately. So that's the reason for the lack of recent posts. But, it's been 22 months since my last relaxer! I'm SO CLOSE to my initial two-year goal!

I've really been trying to play with my hair right after I wash it to get more familiar with my natural 
un-manipulated (is that a word? lol!) texture. 

Here's what it looks like: 
 I really need to trim some more off of the left side (pictured below) because it seems that I've left more straight ends on that side than the left. But, I do like the shape of my hair right now. 

Here's the right side. As I said, here you can hardly even see the straight pieces, whereas on the left they're much more visible:

 Here's the front view so you can see the lopsided shape I'm talking about. This is EASILY taken care of though! Just need to trim off more of the straight stuff. I'm happy regardless because my hair has definitely grown a lot! =) 


And here's what my straw set looks like at 21 months...

...and 22 months!

It gets bigger (and healthier) by the day. =)

Well, that's all for now!
Have a great week and THANK YOU for checking in! =)

Click Here For My Straw Set Tutorial

April 6, 2012

Length Check

Hi!

This week..before I started one of my straw sets, I got a huge itch for chopping off my ends.
So I cut all of the relaxer off from the bottom section of my hair. 

Before:


After (Shrunken):


After (Stretched):

There's a LOT of length there, but man, does my hair deliver a serious dose of shrinkage! lol.
When I saw how much shorter my hair was without the ends, I decided to only cut the relaxer from that bottom layer completely and just do a light trim of the rest of it. My itch and temporary curiosity were satisfied. 

Here's how this particular straw set turned out:

I actually really like how it turned out with my trim!

Anyway, for those who celebrate: happy Easter weekend!
Have a safe, fun and blessed one! 
=)

August 15, 2011

Feather Extensions For Curly Hair (Part 2)

Hi all!

I promised I'd try curling my feather extensions and share the results. Here's how they turned out:


Here's the same photos in the video for a better view. =)


A sidenote: This hair accessory is not my favorite thing ever, but after searching high and low for pictures and video of feathers for curly hair, I decided I'd give it a shot anyway for any curly-heads out there who might be curious. =)
 That's all for now! =)

CLICK HERE  to see the feathers in their natural, straight form.

August 7, 2011

Feather Extensions For Curly Hair (Part 1) + Cute New Tank

Hi all!

It seems like one of the latest hair trends is feather extensions. A variety of different colored and sized feathers can be seen on celebrities from Hilary Duff to Jennifer Love Hewitt to Selena Gomez.

Disclaimer: I do not own this image. 

So I wondered...how would they look on curly  hair. And not just Taylor Swift curly, but super-tight, pencil or straw like circumference curls (or even tighter)? I searched and searched for examples online, but couldn't find anything. So I decided to go ahead and buy some on e-bay and give it a shot. These feathers can be washed, blow dried, curled or straightened and otherwise treated like your own hair. The way they're shown in these photos is before I altered them in any way. I intend to show you all how I curled them into tight little curls in a later post and video, but I actually (surprisingly) like how they look straight out of the package too! What do you think?


UPDATE: CLICK HERE to see the feathers after I curled them.

This weekend I also had the chance to debut my new natural hair top.
It was originally a large t-shirt that I modified into a tank. I love the way it came out.
Here's a photo of it on. Bad quality, but you get the idea.


Here's a close-up of the image detail.


I bought the t-shirt from Zazzle.com. They have several style, size and color options. Here's the link to the one I modified: http://www.zazzle.com/afros_are_love_tshirt-235225762294239588

I hope everyone had a great weekend!
That's all for now. =)


July 12, 2011

A Few Henna Color/Tint Before & Afters

This video was made to serve as a resource for people with dark hair who want to know what their hair might look like after a henna treatment in terms of color and tint.  Sometimes the color is not as noticeable, regardless of whether you are outdoors or not, (the first 2 sets of photos) while other times it's much more apparent (the rest of the photos.) There's a wide range of possibility and it all depends on how your hair decides to act that day! haha. So for anyone out there curious to try henna for color, take a look!

PS. At 2:33, the video cuts out for some reason. :/ The part that got cut off was me trying to say "Depending on how much lemon juice you add or don't add, that will determine how much the red tint will pop."


I have a lot more planned for upcoming videos that I will be posting here, including revealing what a full year of my new growth looks like, an attempt at feather hair extensions for transitioners/naturals, and my first try at a "satin scarf" braidout. Will that solve my straggly end problem? Be on the lookout for those!

I hope you're all enjoying your summer! And thanks so much for reading. =)

June 22, 2011

10-months Post Relaxer

Hi all!
I'm officially a University of California, Riverside alumnus. It feels so strange!
I wore a straw set  to the ceremony (surprise!)  
I had to practice getting the damn mortarboard hat to stay put, but it ended up working out.
I didn't even get "hat hair!" =) 


It's been ten months since my last relaxer and my hair has grown a lot.
I gauge it's length by how many "dips" or "waves" I can count.
I'm not ready to lose so much length yet, and I don't really have a plan on when I'm thinking of doing the Big Chop. So for now, I'm just waiting it out, straw setting and getting excited about the progress.

@2 months:


@ 10 months:


@ 4 months:

@ 10 months


In other news: My boyfriend's parents are flying in to CA from Maryland and they have a lot planned for us.
So this coming week, I'll be with them at their time share on a (much needed) mini-vacation!
Look for twitter updates on that. =)

That's all for now!
Happy first week of Summer!